This project had a need for a modern portal to replace their aging PHP site and sync data with the latest version of Dynamics NAV. The site was built as a customer ticketing portal for submitting requests for troubleshooting and repairs of equipment used at bank and ATM locations across the country. The new portal needed most of the featureset of the original site but must try to solve some of the problem areas they had working on the site with NAV. I took the core eCommerce engine & took it down to the minimum elements they would need and built up the required workflows from there in React. This site uses a C# back end in .NET Framework with EntityFramework to communicate to an MS SQL database and a React front end, all custom software development.
Home Page
The home page is simple, with static content other than the menu in the upper right, which for anonymous users would say Sign In and on click would open a modal to enter login information. If the user needed to register to use the site, a link was available to a simple DotNetNuke ActionForm which would take basic information and forward it in an email to the WBS back-office for verification that the account was genuine and connected with a real client account. A password would be generated by the administrators and their login sent to them in an email. On first login to the site, they would be forced to set their password to a new value for the security of the account.

Dashboard Page
The dashboard page would dynamically show pages based on the roles assigned to the user by administrators. Some users would have access to submit new service calls, review existing service calls, or look at reports of work done in the past. Each card on the page would link to the respective area of the site.

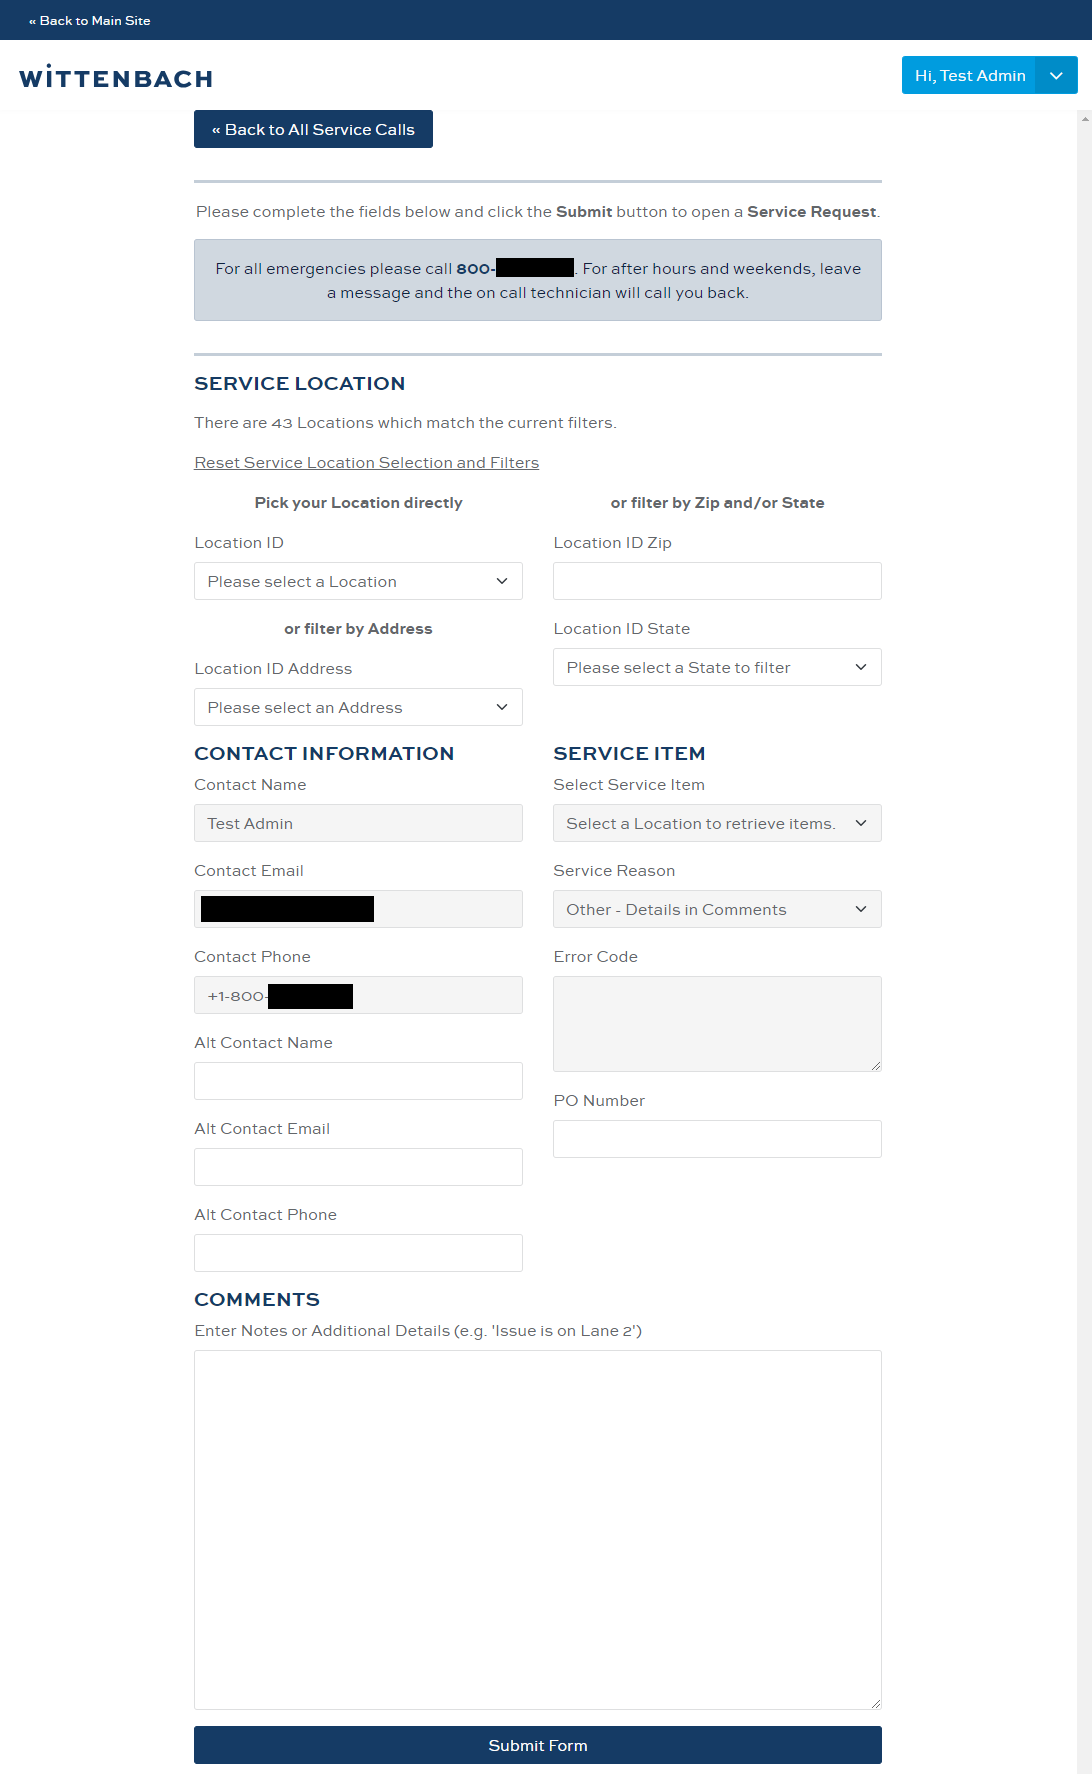
New Service Call Submission Page
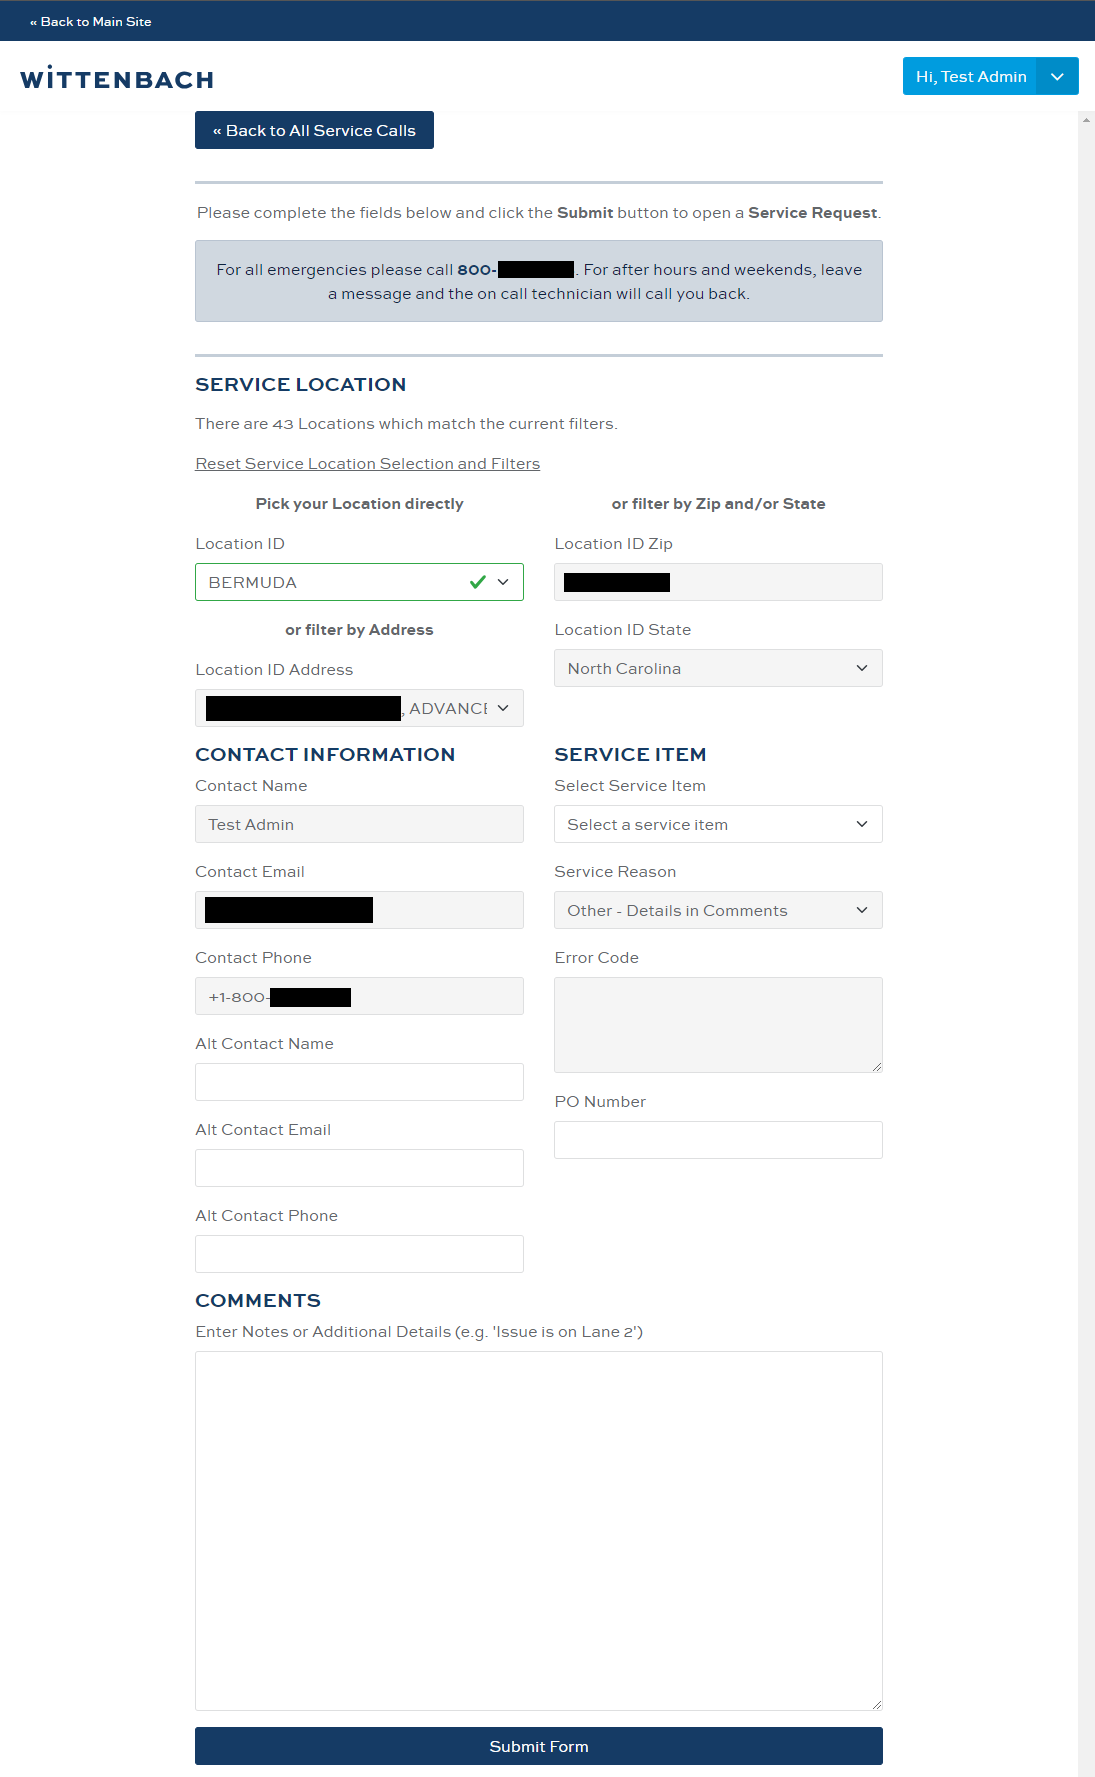
The key functionality of this site was to be New Service Calls. The page would need to recognize who was logged in and what “Locations” (Branches) the user had authority to submit requests for. Some users would only have access to their one branch while others, called “grandfathers” would be able to see an entire geographical region’s worth of data and could submit on behalf of any branch in their region. There were some instances where grandfathers could access more than a thousand individual branches, so narrowing down data with easily identifiable information, such as the zip code, was essential for such users to still be able to get through this process quickly.
On opening the page, the user was presented with some options for finding the appropriate branch:
- Pick the Location from the dropdown directly, which is fine for most accounts as they would have either one branch to select, or only a handful. For the large grandfathers, it wasn’t feasible to load more than a thousand select options in HTML as we would need to page the data loaded from the server. For these cases, they should use one of the other options to narrow the data down.
- Filter the Location dropdown using the Zip box. Entering a partial or full zip code would narrow entries in the main Location dropdown to those that matched. This would readily remove the majority of records to a visually manageable count and was the most common way users would filter information.
- Filter the Location dropdown using the State box. Selecting the US state would limit the list to the ones that match by state, this filter could be used in conjunction with the Zip filter.
- Filter the list by Address, which showed the street address of the Branch.
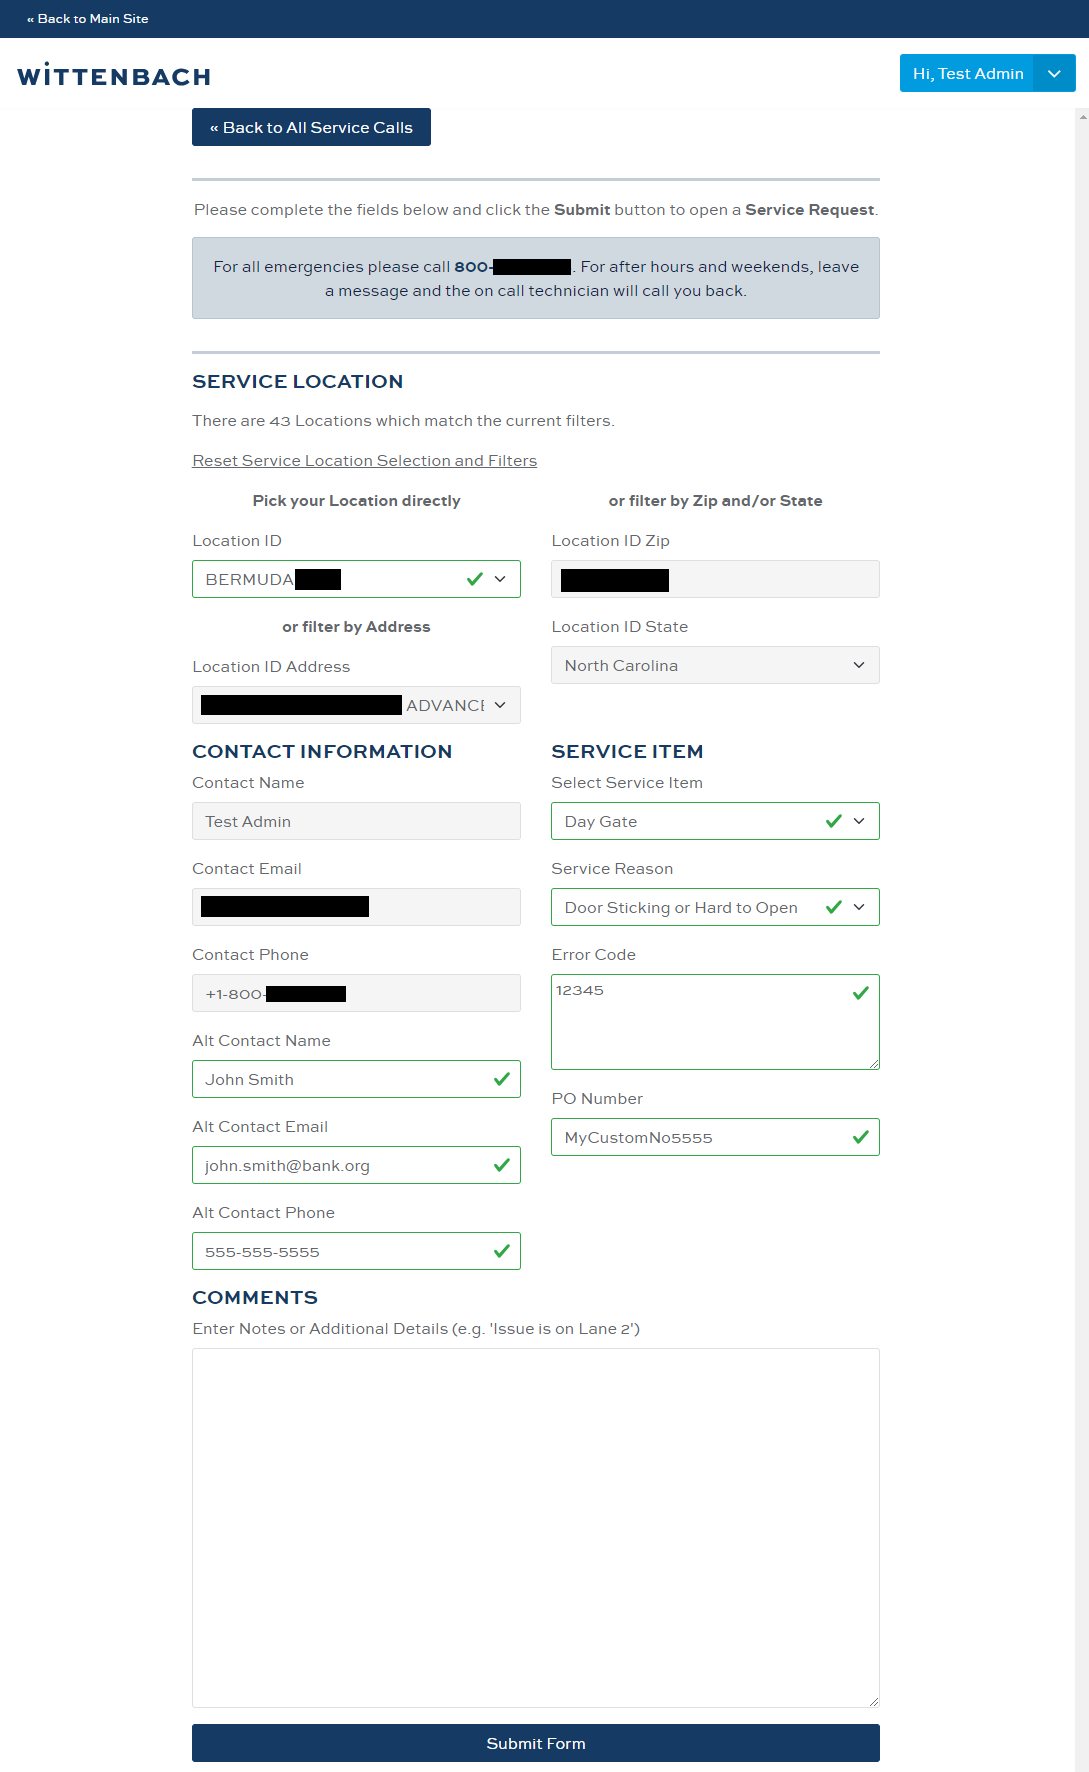
Once the user had located the branch they wanted to use for the request by selecting it in the Location dropdown, it would populate that branch’s data oto the other filter boxes and make them readonly. If the user needed to clear that out and try again a reset link was clickable at the top of the form. If the user was ready to move on from the selection, they could then optionally fill in alternate contact info. This alternate info was useful in case there was an onsite person that a technician should communicate with to do work directly with the equipment, versus a regional associate that might be hundreds of miles away.
Next, the user would attempt to select the equipment that was in need of service. Due to a large percentage of requests not selecting the correct item by serial number or other identifier and having to correct it later, WBS decided to instead make a generic list of equipment and let the onsite technician directly identify the actual object. The user would select the item, select from a quick list of common issues, or select “Other”, and then enter in any Error Codes or other pertinent info. The user could enter a PO Number for their own reference back to the ticket later.
Finally, the user could enter any amount of notes about the situation as comments and then submit the form.
In the original site, the PHP here would attempt to directly communicate with the NAV API to get the “next” identifier locked for use, and then insert data to the NAV database. If multiple users were on the site at the same time, sometimes conflicts would occur with that request and return errors to the end user. They would have to retry over and over to submit until it went through successfully.
In the new site, we would store the submission in the ecommerce database instead and use integration software to pick up the data and pull it over to NAV using their newer REST API options. This way the customer never had to deal with the idiosyncrasies of NAV just trying to submit a ticket. Once the data was successfully pushed to NAV, the integration software would then update the ecommerce data with the relevant identifying key(s) and then monitor for changes on a cron schedule to push data either direction (mostly from NAV).
Open Service Calls Grid Page
If the user has appropriate access, they can view a grid which lets them page through the history of service calls. This grid was fitlerable by the service number or by the status of the request. Byclicking the SRV# of the row, the user would be taken to a details page.

Exiting Service Call Details Page
Here, end users would be presented with the extended info about the request and it’s status, including when the technician would arrive, notes about the call taken by the tech, administrators, or the end user, the location and contact information. Once the technician had properly identified the actual equipment to be serviced, it would be set through their mobile application, pushed into NAV, then the integration software would pick it up out of NAV and push updated info to the ecommerce database and display on this page. The user could also cancel a service request if necessary.

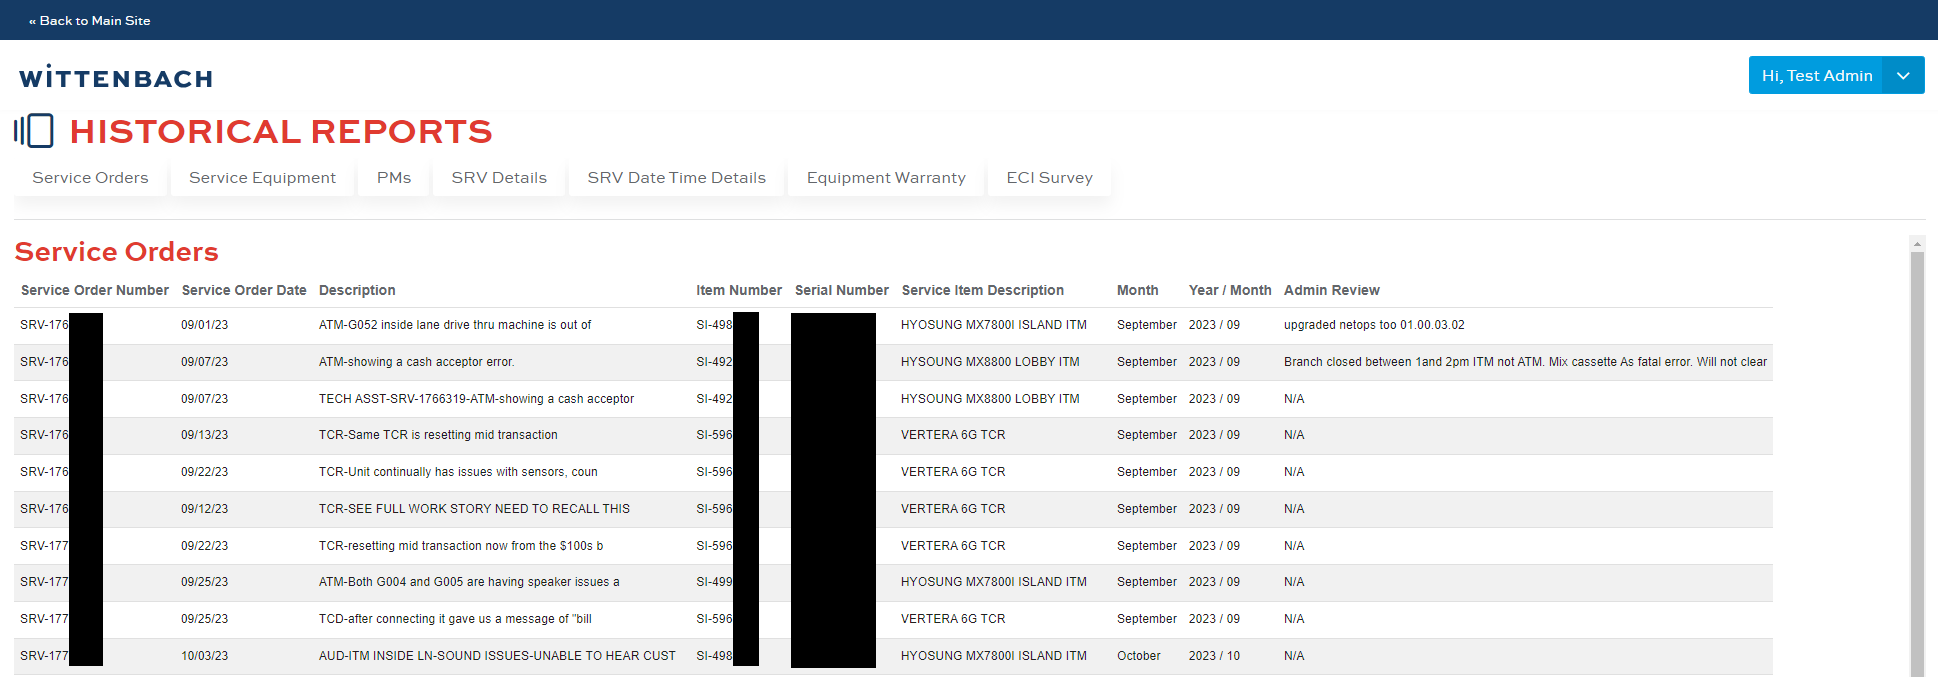
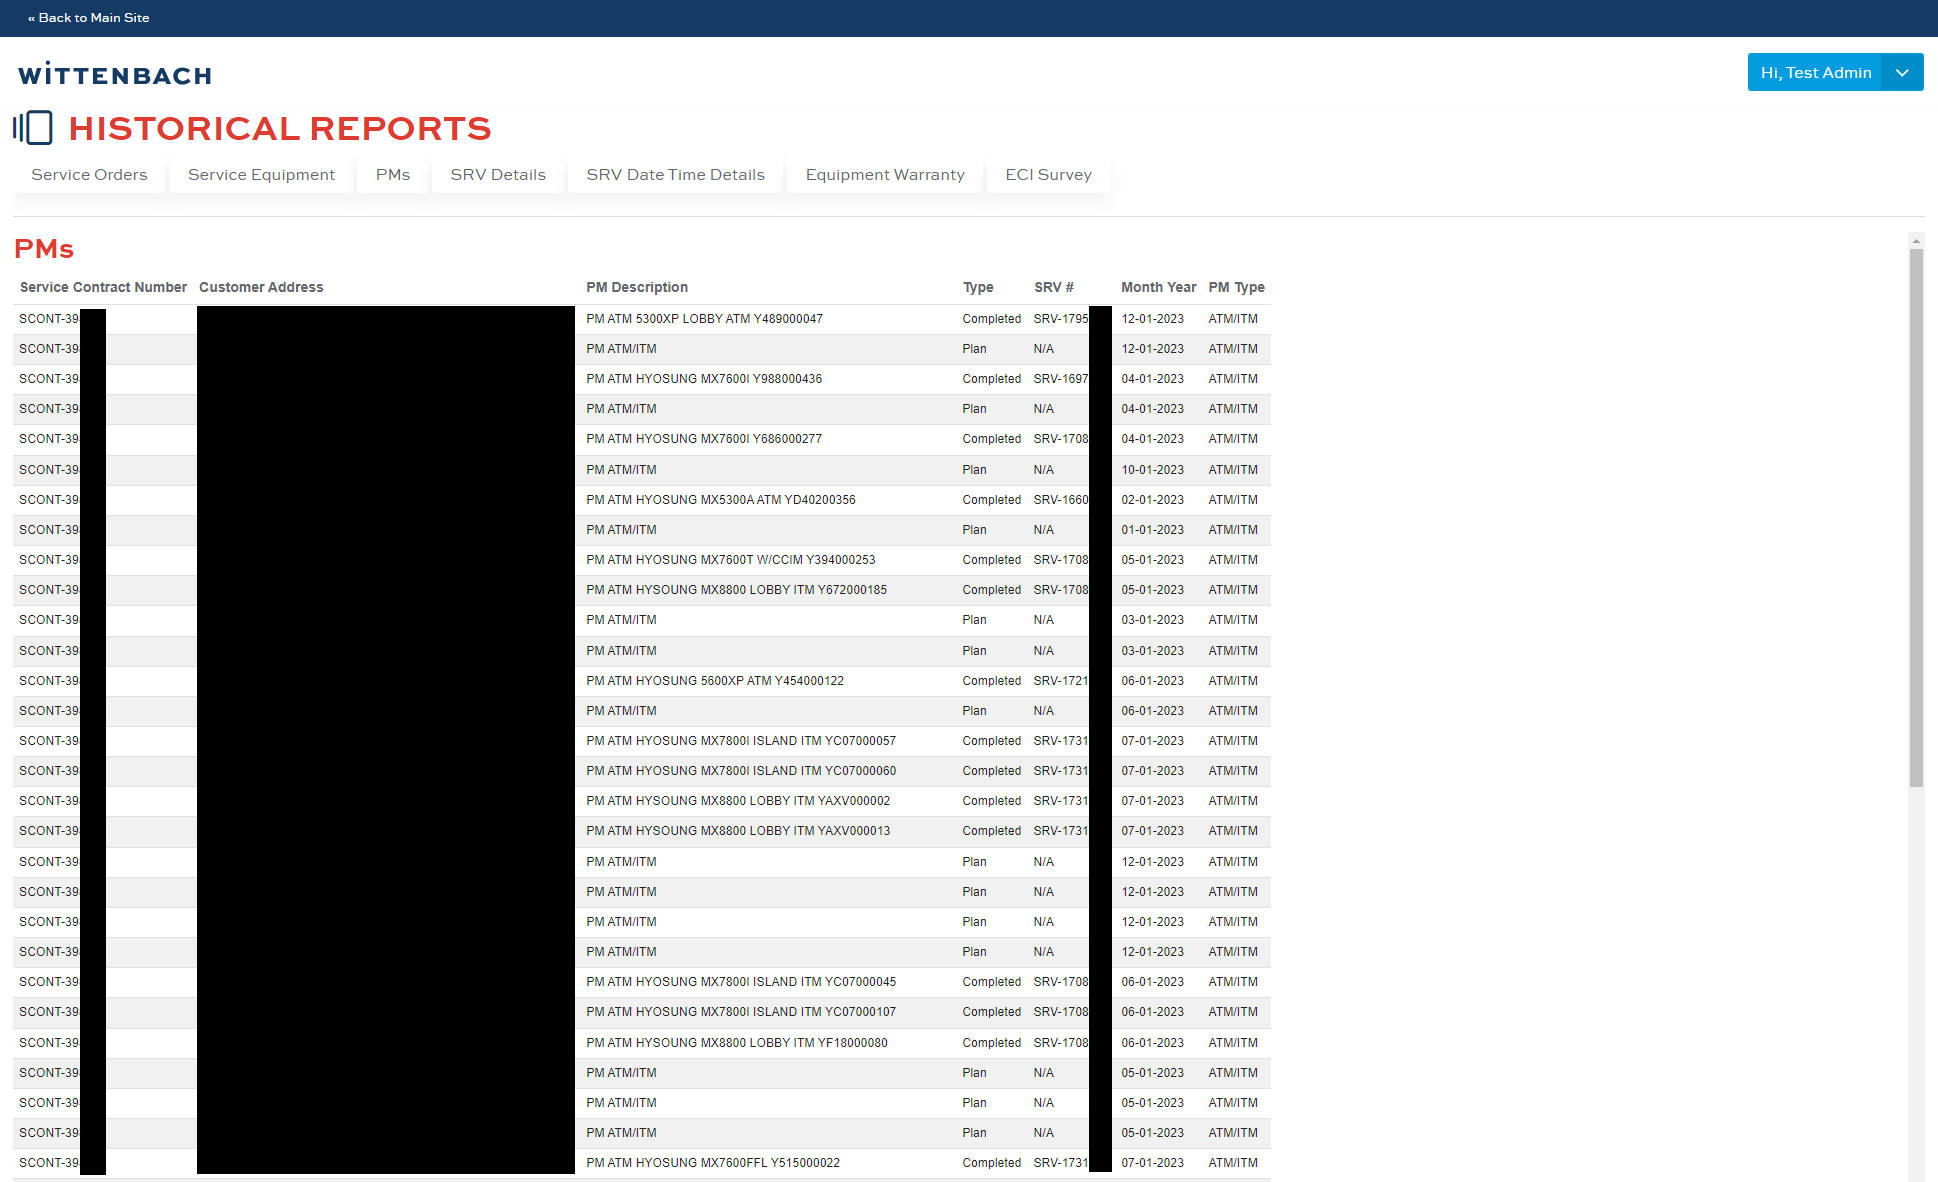
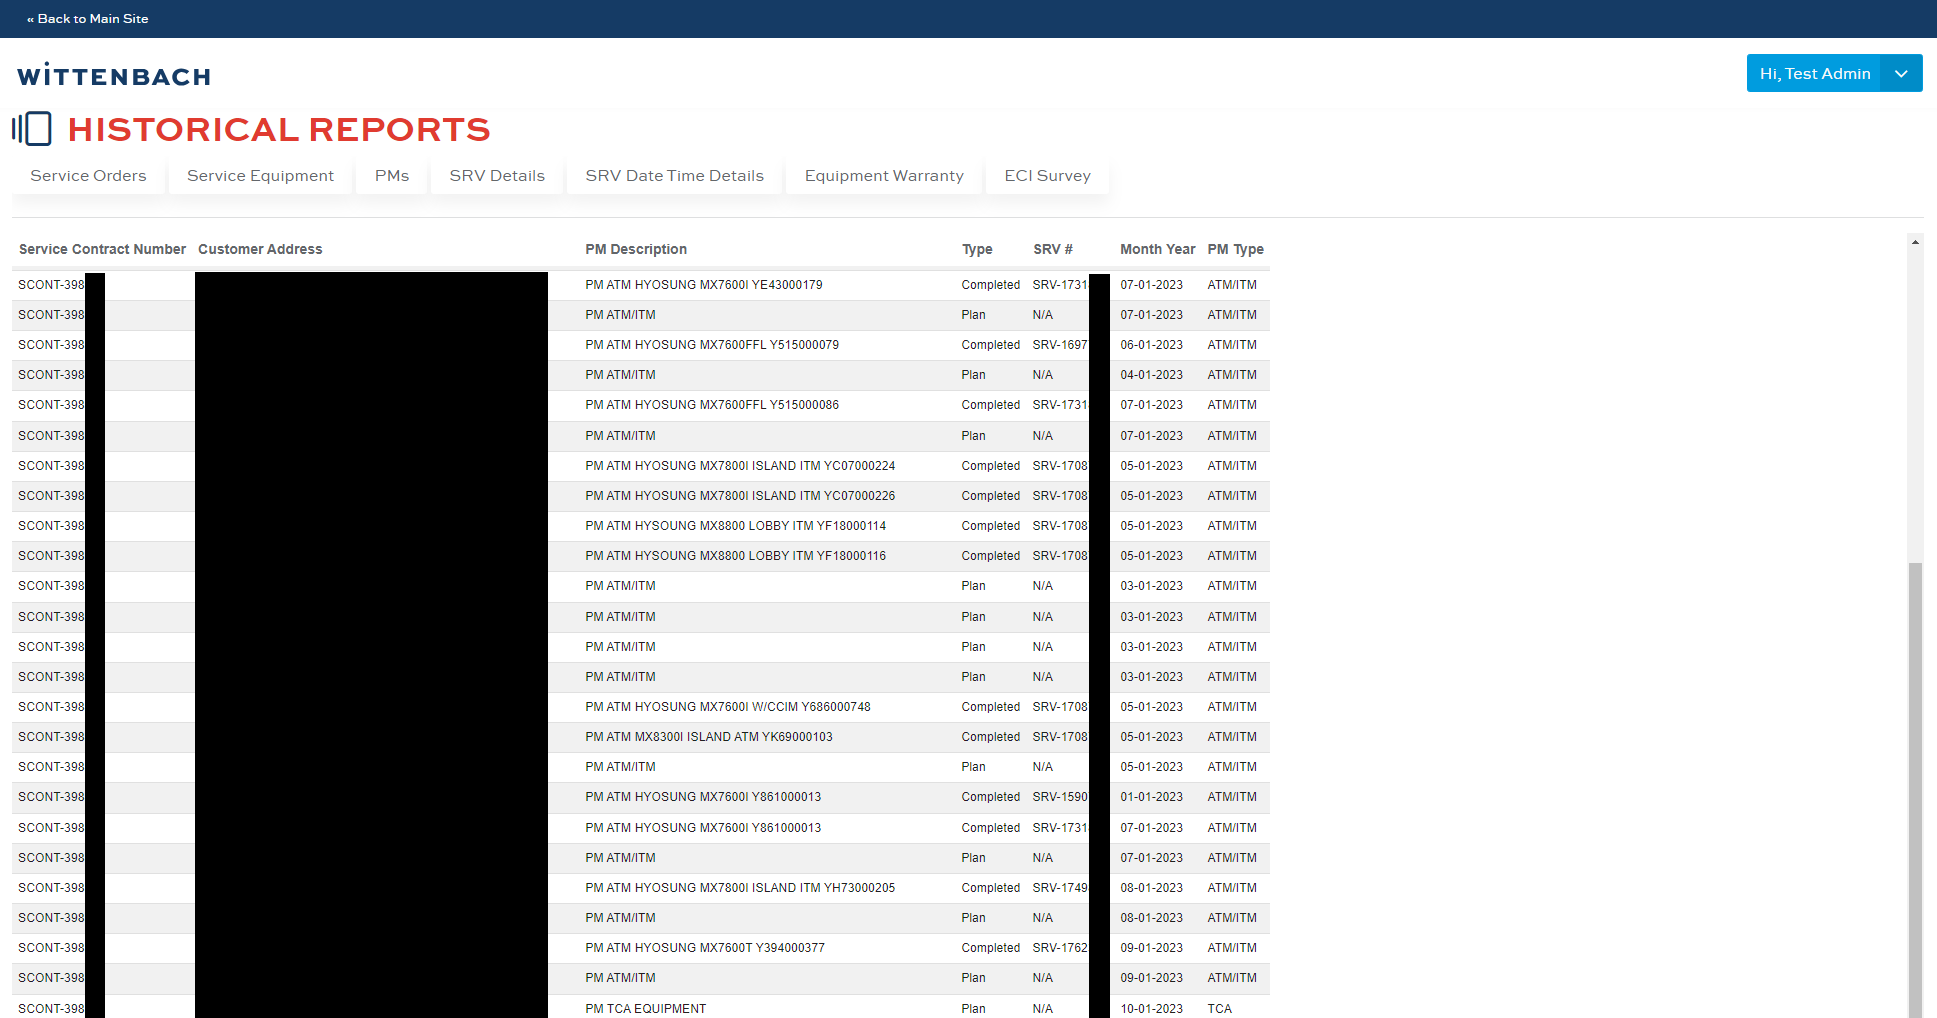
Historical Reports Page
For some users of large accounts, there might be users that needed to see reporting on how much equipment is being serviced across their region. The Historical Reports area was a collection of database tables and views which had pre-aggregated data for the accounts and I developed a mechanism in C# on the server behind the API that would dynamically query those tables and views and display whatever data was in them, filtered to what the user should have been able to access. A sticky header allowed the user to scroll down the page without losing the headings of each column.